ssh服务可以很方便的通过网络登录到linux开发板,同时支持sftp协议向开发板传输文件。下面简单讲下移植过程。
开发板环境:
名称:imx283内核:Linux2.6.35.31.下载源码zlib下载openssl下载openssh下载
建议先下载openssh,openssh也不要下载最新版本,zlib和openssl的版本最好早于openssh的版本,因为openssh的编译会用到zlib和openssl生成的库 ,若zlib和openssl的版本比openssh新,可能在编译openssh时出现不兼容等问题。
我这里下载的是zlib-1.2.8、openssl-1.0.2、openssh-7.1p1。
2.zlib编译
解压zlib-1.2.8,进入zlib根目录
1>./configure –Static –prefix=/test/open-ssh/zlib/ 生成makefile
–static 表示生成静态库 也可以使用–share生成动态库
–prefix 指定make install的安装目录2>修改makefile 更换编译器为交叉编译器 CC=arm-fsl-linux–gnueabi-gcc LDSHAred=arm-fsl-Linux-gnueabi-gcc CPP=arm-fsl-linux-gnueabi-gcc -E AR=arm-fsl-linux-gnueabi-ar
3>make 4>make install
3.openssl编译
解压openssl源码,进入源码根目录
1.配置 openssl的新旧版本配置方式有点不同,具体配置方式可以查看./configure -h
1.1.1版本配置:
代码语言:JavaScript代码运行次数:0运行复制
./Configure linux-generic32 no-asm shared no-async --prefix=/test/open-ssh/open-ssl1/ CROSS_COMPILE=/ZLG_linux/gcc-4.4.4-glibc-2.11.1-multilib-1.0/arm-fsl-linux-gnueabi/bin/arm-fsl-linux-gnueabi- CC=gcc -fPIC
linux-generic32:32位系统 no-asm:在交叉编译过程中不使用汇编代码代码加速编译过程 shared:生成动态连接库 no-async:不使用GNU的ucontext库 交叉编译工具链没有提供GNU C的ucontext库 –prefix:指定install输出的目录 CROSS_COMPILE:指定编译器,需要绝对路径 -fPIC全称是position Independent Code,用于生成位置无关代码,代码无绝对跳转,都是相对跳转。
1.0.2版本配置:
代码语言:javascript代码运行次数:0运行复制
./Configure --prefix=/test/open-ssh/open-ssl/ os/compiler:/ZLG_linux/gcc-4.4.4-glibc-2.11.1-multilib-1.0/arm-fsl-linux-gnueabi/bin/arm-fsl-linux-gnueabi-gcc
–prefix 指定make install的安装目录
这里交叉编译器路径最好使用绝对路径
2.编译 make 3.安装 make install
4.openssh编译
解压openssh源码,进入源码主目录
1.配置 生成MakeFile
代码语言:javascript代码运行次数:0运行复制
./configure --host=arm-fsl-linux-gnueabi --with-libs --with-zlib=/test/open-ssh/zlib --with-ssl-dir=/test/open-ssh/open-ssl --disable-etc-default-login CC=arm-fsl-linux-gnueabi-gcc AR=arm-fsl-linux-gnueabi-ar
这里需要指定刚刚安装的zlib和openssl目录
2.编译
make
5.拷贝openssh相关文件和密钥
这部分工作包括新建文件夹、将生成的sshd相关工具拷贝到各个文件夹、生成密钥。我把这些写成了一个shell脚本pack.sh,该脚本首先新建一个usr文件夹,然后在usr下新建需要的各级子文件夹,接着会生成需要的密钥并把需要的sshd相关工具和密钥拷贝到这些文件夹,最后将usr下所有文件打包 并生成usr.tar.bz2压缩包。
注意:pack.sh需要放在openssh源码根目录下运行
代码语言:javascript代码运行次数:0运行复制
#!/bin/bashfile_a="scp sftp ssh ssh-add ssh-agent ssh-keygen ssh-keyscan" file_b="moduli ssh_config sshd_config" file_c="sftp-server ssh-keysign"key="ssh_host_rsa_key ssh_host_dsa_key ssh_host_ecdsa_key ssh_host_ed25519_key" mkdir -p usr/local/bin usr/local/etc usr/libexec mkdir usr/sbin/for i in $file_adoif [ -f $i ];thencp $i usr/local/bin/echo "cp $i ok" elseecho "error:$i not exist " exit_script fidonefor i in $file_bdoif [ -f $i ];thencp $i usr/local/etc/echo "cp $i ok"elseecho "error:$i not exist"exit_script fidonefor i in $file_cdo if [ -f $i ];then cp $i usr/libexec echo "cp $i ok" else echo "error:$i not exist" exit_script fidoneif [ -f "sshd" ];thencp sshd usr/sbin/echo "cp sshd ok"elseecho "error:sshd not exist"exit_scriptfi# ssh_host_rsa_keyif [ -f "ssh_host_rsa_key" ];thenecho "ssh_host_rsa_key exist"cp ssh_host_rsa_key usr/local/etc/echo "cp ssh_host_rsa_key ok" elsessh-keygen -t rsa -f ssh_host_rsa_key -N ""cp ssh_host_rsa_key usr/local/etc/echo "cp ssh_host_rsa_key ok" fi# ssh_host_dsa_keyif [ -f "ssh_host_dsa_key" ];thenecho "ssh_host_dsa_key exist"cp ssh_host_dsa_key usr/local/etc/echo "cp ssh_host_dsa_key ok" elsessh-keygen -t dsa -f ssh_host_dsa_key -N ""cp ssh_host_dsa_key usr/local/etc/echo "cp ssh_host_dsa_key ok" fi# ssh_host_ecdsa_keyif [ -f "ssh_host_ecdsa_key" ];thenecho "ssh_host_ecdsa_key exist"cp ssh_host_ecdsa_key usr/local/etc/echo "cp ssh_host_ecdsa_key ok" elsessh-keygen -t ecdsa -f ssh_host_ecdsa_key -N ""cp ssh_host_ecdsa_key usr/local/etc/echo "cp ssh_host_ecdsa_key ok" fi# ssh_host_ed25519_keyif [ -f "ssh_host_ed25519_key" ];thenecho "ssh_host_ed25519_key exist"chmod 600 ssh_host_ed25519_keycp ssh_host_ed25519_key usr/local/etc/echo "cp ssh_host_ed25519_key ok" elsessh-keygen -t dsa -f ssh_host_ed25519_key -N ""chmod 600 ssh_host_ed25519_keycp ssh_host_ed25519_key usr/local/etc/echo "cp ssh_host_ed25519_key ok" fitar -cjvf usr.tar.bz2 usr/*echo "pack usr to usr.tar.bz2 ok"
生成usr.tar.bz2压缩包之后,将该压缩包拷贝到开发板的根目录下并解压,压缩包内的usr目录会和开发板根目录下的usr合并。
6.拷贝openssh运行需要的动态库
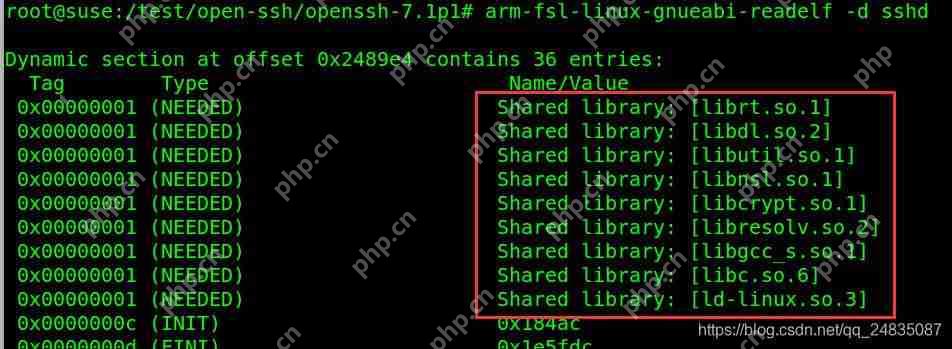
首先可以在openssh源码根目录下运行:arm-fsl-linux-gnueabi-readelf -d sshd 就可以知道sshd需要哪些动态库

如果你开发板的文件系统能够运行起来,那么其中的大部分库应该是有的,缺少的可能是libcrypt.so.1和libz.so.1,libcrypt.so.1在openssl源码根目录下可以找到,libz.so.1在libz源码的根目录下。将缺少的库拷贝到开发板/lib下即可。
7.修改SSHD配置、增加root用户密码将开发板/usr/local/etc/sshd_config,将PermitRootLogin yes前的注释“#”号去掉,若没有这一句,增加这一句即可。开发板执行passwd root,给root用户增加密码,若之前有密码,这一步可跳过。开发板打开 /etc/passwd 文件,在最后添加一行:sshd:x:74:74:Privilege-separated SSH:/var/empty/sshd:/sbin/nologin开发板打开/etc/init.d/rcS,在最后增加一句:/usr/sbin/sshd &,让ssh服务开机在后台启动(必须保证此时网卡已经配置好,否则启动ssh服务需要放到网卡配置后面)
最后重启开发板!
8.测试
首先执行ps,看下ssh服务是否已经启动

用secureCRT或者其他ssh工具连接开发板!
部分用xshell工具的同学可能会遇到下面的问题:
WARNING! The remote SSH server rejected X11 forwarding request. 解决办法:xshell——会话——属性——隧道——取消勾选X11转发
参考博客:
1.成功移植 SSH 服务到 ARM 开发板上
2.移植 ssh 到开发板
3.12个移植OpenSSH 到 ARM Linux 开发板上常见错误总结


